CAN to Zigbee
2026-08-11Youtube channel "Transport Evolved" recently released a video on alternatives to OnStar for vehicle telematics, highlighting the limitations and security considerations of using proprietary systems. Although the demonstrated system "Open Vehicle Monitoring System" (OVMS) looks very professional and encompasses a wide variety of vehicles and use cases, it retails for $300-$400 as of writing. However, it doesn't work out of the box with every vehicle, so if you aren't on the list you'll have to DIY an interface in order to make it work.
If you're in the basket of having to DIY an interface anyways, why not try something even a little more DIY? I don't need many of the features that OVMS offers, so including those is just an added expense. All I personally want is a way to monitor the charging, so I can make sure that I don't wake up in the morning to a car with a flat battery. I don't need an LTE module for monitoring when I'm out driving the car, as I'm either in the car or I know where I left it and that it's not charging. I don't need remote cabin preconditioning or door controls, as I can use the key fob for those things from inside the house, so I don't need any fancy wiring harness to get deep access into the vehicle communications network. All I need is something to read the OBD-II diagnostics and get them to my phone in the evenings. An ESP32 with a CAN module and a breakout cable can handle that easily.
There are many ways to transmit data. For a lot of smart home enthusiasts, the pinnacle of ESP32 is ESPHome on Wi-Fi. As great as that is, Wi-Fi requires relatively large amounts of power that might drain a vehicle's accessory power needlessly, if there's even good reception out where you park your vehicle. BLE is a reasonable low-power alternative to Wi-Fi but range is still an issue and it's not common to have a reliable network of high gain bluetooth antennas in the home. My preference, instead, is Zigbee. Zigbee requires very little power, and its range can be easily extended by mesh repeaters that are frequently built into hardwired Zigbee devices as a matter of course. I keep one relatively high gain Zigbee antenna attached to my central hub, and use an Ikea lightbulb near the driveway as a Zigbee router to blanket the driveway with Zigbee coverage. To join my car to the Zigbee mesh, I picked out an esp32-c6 development board that has built-in CAN (provided you add a cheap transceiver IC) and supports Zigbee communication in addition to the esp32 standard Wi-Fi and Bluetooth.
With North American pricing on Amazon at time of writing, and assuming you already have basic electronics stuff on hand such as resistors of varying values and soldering equipment, that brings the price down for charge monitoring from OnStar's $$/month and OVMS's $300-400 to an under-$30 project.
- $6.99 - OBD-II breakout cable
- $11.99 - ESP32-C6-DevKitC-1-N8
- $8.99 - TJA1050 transceiver board (6x)
- $5.99 - 12v to 5v DC to DC regulator
I already had an OBD-II breakout cable for reasons, so my cost was just about
$25 to throw this together. And as a proof of concept, or if you're cheap,
molding hot glue over wires jammed into the connector is always an option! 
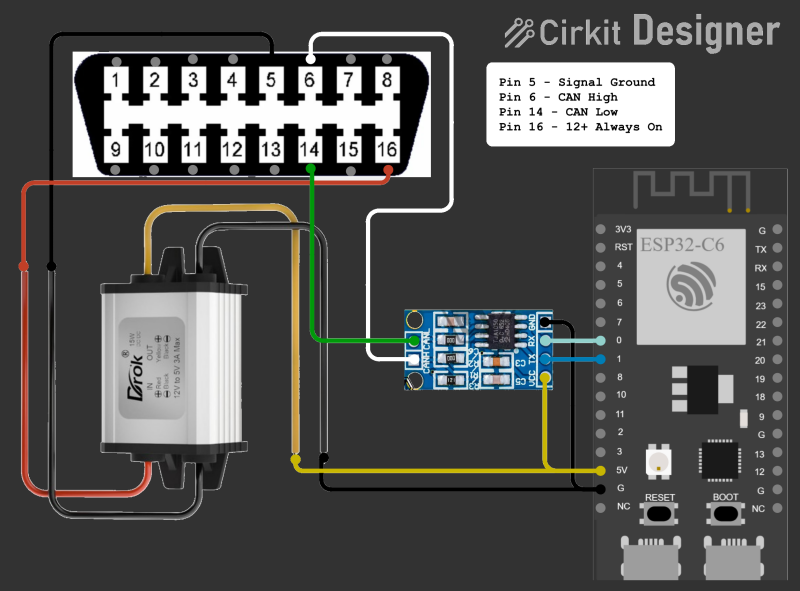
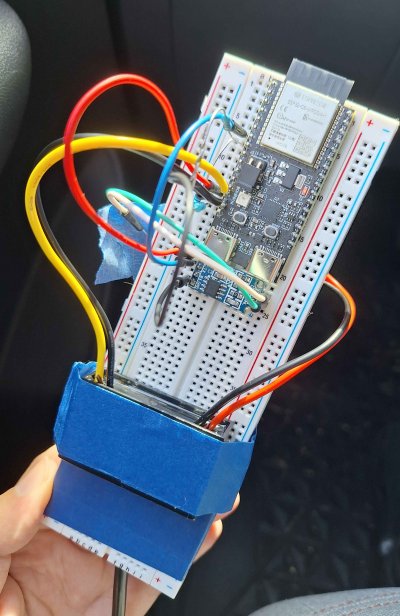
I programmed the board using the Arduino IDE, as I could not get the Espressif IDE to install on my Chromebook. However, I hear that the Espressif IDE may have better or more up to date libraries for Zigbee and CAN so if you can use the Espressif IDE that may be recommended.
In the Arduino IDE, make sure to install ESP32 board support. Instructions for doing that can be found from the android-esp32 GitHub page. At the time of writing, you need to open the Arduino "Preferences" window and add an "Additional Boards Manual URLs" entry, with this URL:
https://espressif.github.io/arduino-esp32/package_esp32_index.json
Then go to the "Tools > Board > Boards Manager" menu and install the "esp32 by Espressif Systems" boards. Afterwards, use the "Tools > Board > esp32" menu to select the board (I'm using the ESP32C6 board).
Here's the project file: Project.ino
Make sure that you configure your project to use the appropriate settings. For me, that meant opening the Tools menu and changing these settings:
- USB CDC On Boot: "Enabled" (this makes serial output work)
- Flash Size: "4MB"
- Partition Scheme: "Zigbee 4MB with spiffs"
- Zigbee Mode: "Zigbee ED (End Device)"
Once the board is flashed, plugged up to the car, and running, it should become available in your Zigbee coordinator (I'm using Home Assistant ZHA) as a new device. If not, you may have poor signal strength and need to install a Zigbee router near your parking area, like an Ikea light bulb or smart outlet.
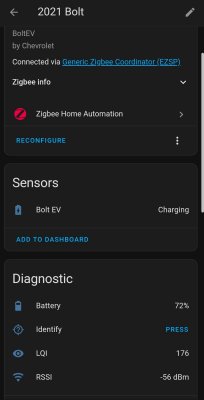
Once everything is up and working, feel free to solder things together and throw it into a hobby box. I used a random small cardboard box I had laying around, but for reliability it'd probably be best to find or print a suitable plastic box. I wedged mine up under the dash because I had enough signal strength that it worked properly, but if you have poor signal strength and can't improve it with a Zigbee router, maybe try sticking it to the dashboard so you can have better sight lines towards your residence. Velccro tape sounds like a great way to attach it to me!
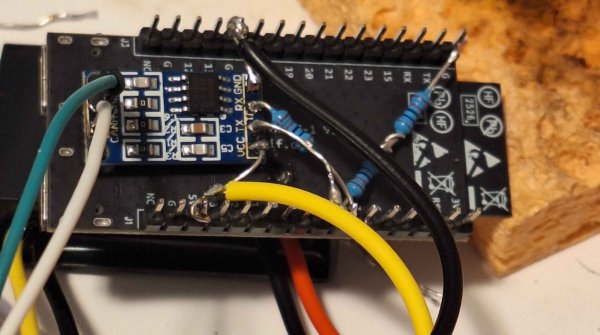
I'm sure the code could be greatly improved. It takes a long time to start publishing data again after going for a drive. Half an hour or more, sometimes. It's not optimized for low power usage, since when I tried putting the board to sleep it made the Zigbee stack freak out. If you know more about programming ESP32 boards for Zigbee, please drop me a line. It also looks like the ESPHome project has much better Zigbee and CAN support than it used to, so I may try a revision later using ESPHome and see if that improves the system any. So, for best results, I suggest unplugging the OBD-II connector before leaving the house and plugging it back in after returning.
Thanks for reading!